正 文:
随着HTTP SSL的发展,越来越多注重安全的网站采用了 HTTPS 连接传输,这种传输的方式防止了在传输的过程中被中间的路由或第三方窃取敏感信息,因此在银行支付、股票、账户登录等敏感信息的页面一般需要采用 https 传输。
HTTPS(全称:Hyper Text Transfer Protocol over Secure Socket Layer),是以安全为目标的HTTP通道,简单讲是HTTP的安全版。即
HTTP下加入SSL层,HTTPS的安全基础是SSL,因此加密的详细内容就需要SSL。 它是一个URI scheme(抽象标识符体系),句法类同http:体系。用于安全的HTTP数据传输。https:URL表明它使用了HTTP,但HTTPS存在不同于HTTP的默认端口(一般是443端口)及一个加密/身份验证层(在HTTP与TCP之间)。现在它被广泛用于万维网上安全敏感的通讯,例如交易支付方面。
本文飘易就和大家讨论下架设Nginx环境(lnmp)下的 HTTP ssl。
一、【
准备工作】:
1、SSL 需要独立IP,因此你需要购买一台vps或服务器(一般选用centos)。
2、安装Nginx。
为了节省时间,可以安装LNmp安装包。LNmp一键安装包是一个用Linux Shell编写的可以为CentOS/RadHat、Debian/Ubuntu VPS(VDS)或独立主机安装LNmp(Nginx、MySQL、PHP、phpMyAdmin)生产环境的Shell程序。LNmp安装包已经编译好了 ssl 模块,不需要我们单独编译。
3、NameCheap购买Comodo positivessl 证书,一年9美元。
购买网址:
https://www.namecheap.com/security/ssl-certificates/comodo/positivessl.aspxPositiveSSL
PositiveSSL is one of the most popular and inexpensive SSL certificates in the industry. This hassle-free cert is an ideal entry-level solution – a perfect choice for websites that don't deal with large amounts of user info or need to establish trust. It's great for blogs, startups and personal pages. In most cases, the certificate can be issued in 15 minutes or less.
二、使用OpenSSL生成证书 (注:下面蓝色字为执行时输入的命令!)1、生成RSA密钥
cd /usr/local/nginx/conf/
openssl genrsa -out jungehost.pem 2048Generating RSA private key, 2048 bit long modulus
.....+++
.+++
e is 65537 (0x10001)
2、生成一个证书请求
openssl req -new -key jungehost.pem -out jungehost.csrYou are about to be asked to enter information that will be incorporated
into your certificate request.
What you are about to enter is what is called a Distinguished Name or a DN.
There are quite a few fields but you can leave some blank
For some fields there will be a default value,
If you enter '.', the field will be left blank.
-----
Country Name (2 letter code) [AU]:CN //输入国家简写
State or Province Name (full name) [Some-State]:ShanDong //省市
Locality Name (eg, city) []:JiNan //城市
Organization Name (eg, company) [Internet Widgits Pty Ltd]:JunGe Host //组织名称或公司名称
Organizational Unit Name (eg, section) []: //可以不用填
Common Name (eg, YOUR name) []:jungehost.com //输入要配置ssl的域名,如jungehost.com,注意jungehost.com 和www.jungehost.com 属于不同的域名。
Email Address []:admin@jungehost.com //输入邮箱
Please enter the following 'extra' attributes
to be sent with your certificate request
A challenge password []: //可以不用填
An optional company name []: //可以不用填
按上面的注释输入相关信息后,会在目录下面生成jungehost.csr这个文件,执行cat jungehost.csr
将下面以-----BEGIN CERTIFICATE REQUEST-----开头到-----END CERTIFICATE REQUEST-----结尾的全部内容复制下来。需要使用这个jungehost.csr去NameCheap生成数字证书。
cat jungehost.csr
-----BEGIN CERTIFICATE REQUEST-----
MIIBzTCCATYCAQAwgYwxCzAJBgNVBAYTAkNOMREwDwYDVQQIEwhTaGFuRG9uZzEO
MAwGA1UEBxMFSmlOYW4xEjAQBeNVBAoTCUp1bkdlSG9zdDEOMAwGA1UECxMFanVu
Z2UxEjAQBgNVBAMTCVNoaUp1baBMaTEiMCAGCSqGSIbcDQEJARYTYWRtaW5AanVu
Z2Vob3N0LmNvbTCBnzANBgkqhkiG9w0BAQEFAAOBjQAwgYkCgYEA0R9hda1NJdoO
2tbvHevVY3fdpdn8ESpSewHC9yc9zVoc0tz9Ww5EfpDV9L222xv/Z8DlDf2pUfIG
X7F15qIQJZ/VCUDNxS5Y7bjNTzduMq8yQnqkB6h/dpnlFTJlDQrAl6vaoOhBcB5L
hMLAQBf1V8800MIn3nfxb9E6aoydSk8CAwEAAaAAMA0GCSqGSIb3DQEBBQUAA4GB
AJxQOaFHra/ILos8+HO8Wn/2bhfWAUR4ovyRGKMB/n0BQlHPfNhKbILRv9KI5EUL
dc6HCf3AALetjNiPHrfpJOCj4Ljqchu3WeodthuwRd9hzhZHCf43UiopofbfRzMp
lmAJFuUwN93IgFSrslCh66JaQceNa5x/TQIsmviuKZGC
-----END CERTIFICATE REQUEST-----
三、NameCheap生成数字证书1、登录NameCheap.com后,会在后台首页提示你有一个未激活的SSL认证产品,如下图:
点击上面的“SSL Certificates Page”链接。
2、激活SSL证书
点击“Activate Now”即可激活SSL产品。
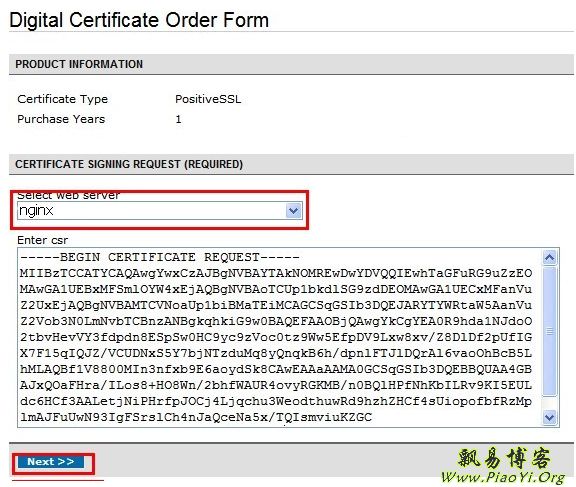
3、向CA(数字证书颁发机构)提交OpenSSL生成的证书。
Web服务器软件选择 Nginx,下面的csr,填写jungehost.csr的内容,即前面要求复制下来的以-----BEGIN CERTIFICATE REQUEST-----开头到-----END CERTIFICATE REQUEST-----结尾的内容。
4、选择域名管理员邮箱,邮箱必须是能够接收到邮件。同时确认一下生成证书时填写的信息是否正确。
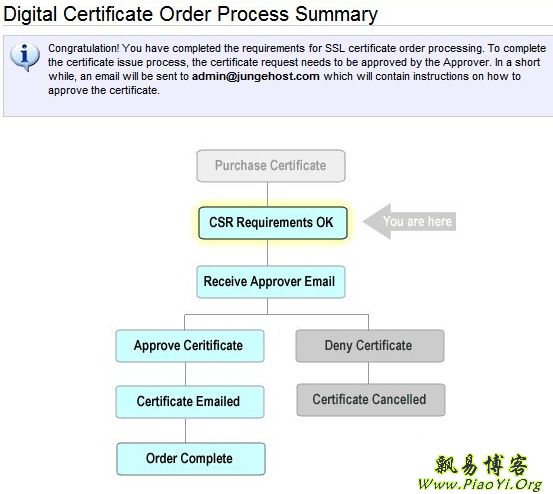
5、提交订单
检查一下信息是否正确,然后点击“Submit Order”。
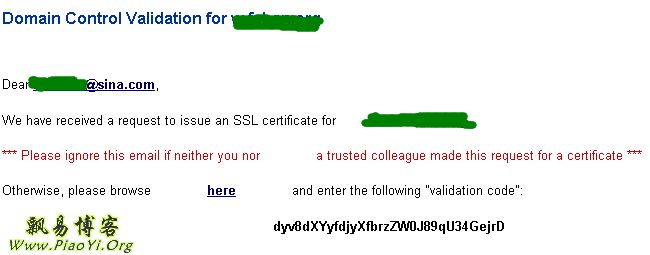
6、邮箱验证
过几分钟或10几分钟邮箱里就会受到一封Comodo寄来的验证邮件,如下图:
点开上面的链接,然后输入上面的优惠码。
验证完成!
7、验证完成后几分钟就会受到Comodo寄来的数字证书。
四、
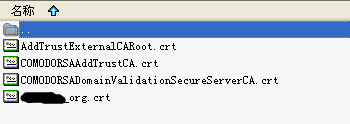
Nginx虚拟主机设置SSL1、下载邮件附件里的xxx.zip,共有四个crt文件:
把上面的4个crt文件直接用记事本打开,然后依次复制 COMODORSAAddTrustCA.crt、COMODORSADomainValidationSecureServerCA.crt、AddTrustExternalCARoot.crt 里面所有的内容到 jungehost_com.crt 最下方即可,
注意顺序。
然后把合并后crt证书上传到 服务器 的
/usr/local/nginx/conf 目录。
【注意】:从2016年开始,Namecheap邮件里只发送2个文件了:
根证书:app_jinyiyun_net.ca-bundle
域名证书:app_jinyiyun_net.crt
我们同样需要把根证书复制到域名证书的最下方,合并成一个新的crt文件上传到服务器。
2、Nginx虚拟主机添加SSL
server
{
listen 443;
server_name jungehost.com www.jungehost.com;
index index.html index.htm index.php;
root /home/wwwroot/jungehost;
ssl on;
ssl_certificate jungehost_com.crt;
ssl_certificate_key jungehost.pem; #这里的pem文件就是上面第一步生成的密钥文件location ~ .*\.(php|php5)?$
{
fastcgi_pass unix:/tmp/php-cgi.sock;
fastcgi_index index.php;
fastcgi_param HTTPS on;include fcgi.conf;
}
access_log off;
}
将以上内容按照自己的配置修改,添加到在nginx.conf 里或虚拟主机配置文件 xx.com.conf 里任意一个server {}的后面即可。
然后执行
/usr/local/nginx/sbin/nginx -t 检查配置是否有错误,执行
kill -HUP `cat /usr/local/nginx/logs/nginx.pid` 重启。
/usr/local/nginx/sbin/nginx -t
the configuration file /usr/local/nginx/conf/nginx.conf syntax is ok
configuration file /usr/local/nginx/conf/nginx.conf test is successful
kill -HUP `cat /usr/local/nginx/logs/nginx.pid`
五、
接下来开启你的 https 之旅吧。
注意,
本文中的图片和文字描述可能会略有差别,因为不是同一个项目的配置过程。
【附注:贴一个飘易实际运行着的nginx配置文件】:
同时支持http和https 访问;如果需要强制把http转到https,可以把http 301跳转,比如:
rewrite ^/(.*) https://w.piaoyi.org/$1 permanent;server
{
listen 80;
#listen [::]:80;
server_name w.piaoyi.org piaoyi.org;
# all http to https
# rewrite ^/(.*) https://w.piaoyi.org/$1 permanent;
index index.html index.htm index.php default.html default.htm default.php;
root /home/wwwroot/w.piaoyi.org;
include none.conf;
#error_page 404 /404.html;
location ~ [^/]\.php(/|$)
{
# comment try_files $uri =404; to enable pathinfo
try_files $uri =404;
fastcgi_pass unix:/tmp/php-cgi.sock;
fastcgi_index index.php;
include fastcgi.conf;
#include pathinfo.conf;
}
location ~ .*\.(gif|jpg|jpeg|png|bmp|swf)$
{
expires 30d;
}
location ~ .*\.(js|css)?$
{
expires 12h;
}
access_log off;
}
# https ssl 443
server
{
listen 443;
server_name w.piaoyi.org piaoyi.org;
index index.html index.htm index.php;
root /home/wwwroot/w.piaoyi.org;
ssl on;
ssl_certificate w_piaoyi_org.crt;
ssl_certificate_key piaoyi.pem;location ~ .*\.(php|php5)?$
{
fastcgi_pass unix:/tmp/php-cgi.sock;
fastcgi_index index.php;
fastcgi_param HTTPS on;include fastcgi.conf;
}
access_log off;
}
【参考】:
*
在LNmp或Nginx上配置NameCheap免费SSL------------------------------------------------------------------
【注意】:
以上的配置是在 LNmp 的环境下安装的,以下说说在 LNmpA 下如何配置 SSL。
如果你的环境是
lnmpa,使用上面的配置文件是不会成功的,会直接报错:502 Bad Gateway。
原因很简单:
lnmpa中是没有fastcgi的,因此,location字段里配置 fastcgi_pass unix:/tmp/php-cgi.sock; 运行模式是不可行的。
那么在代理模式下问题如何解决呢,我们首先看一下lnmpa是如何运行的.
Web服务器环境: linux + nginx proxy + Apache + mod_php + MySQL(lnmpa服务器环境)
由nginx 提供静态文件处理,PHP文件通过代理的方式由 Apache mod_php 来处理PHP请求。
那么如何配置呢?nginx下监听443端口的请求也要转发给apache处理,同时apache的配置文件里也要开启ssl。
nginx的配置443 server配置信息:
#https ssl 443
server
{
listen 443;
server_name app.jinyiyun.net;
index index.html index.htm index.php;
root /storage/wwwroot/app.jinyiyun.net;
ssl on;
ssl_certificate app_jinyiyun_net.crt;
ssl_certificate_key app_jinyiyun_net.pem; location / {
try_files $uri @apache;
}
location @apache {
internal;
proxy_pass http://127.0.0.1:88;
include proxy.conf;
}
location ~ [^/]\.php(/|$)
{
proxy_set_header X-Forwarded-Proto $scheme;#https proxy_pass http://127.0.0.1:88;
include proxy.conf;
}
access_log off;
}
可以看到除去ssl配置的部分(红色字体),HTTPS转发到apache配置的部分和HTTP 是一样的。
apache的配置文件(vhost下的虚拟主机配置文件)也要开启ssl:
<VirtualHost *:88>
ServerAdmin webmaster@example.com
php_admin_value open_basedir "/storage/wwwroot/app.jinyiyun.net:/tmp/:/var/tmp/:/proc/"
DocumentRoot "/storage/wwwroot/app.jinyiyun.net"
ServerName app.jinyiyun.net
SSLEngine on
SSLCertificateFile "/usr/local/nginx/conf/app_jinyiyun_net.crt"
SSLCertificateKeyFile "/usr/local/nginx/conf/app_jinyiyun_net.pem"#ErrorLog "logs/-error_log"
#CustomLog "logs/-access_log" common
</VirtualHost>
红色的部分是配置ssl新增的部分。
重启LNmpA 后,即可正常使用https了。
补充下飘易在实际运行中的 LNmpA 下 nginx 虚拟网站配置的文件信息:
server
{
listen 80;
#listen [::]:80;
server_name app.jinyiyun.net;
index index.html index.htm index.php default.html default.htm default.php;
root /storage/wwwroot/app.jinyiyun.net;
location / {
try_files $uri @apache;
}
location @apache {
internal;
proxy_pass http://127.0.0.1:88;
include proxy.conf;
}
location ~ [^/]\.php(/|$)
{
proxy_pass http://127.0.0.1:88;
include proxy.conf;
}
location ~ .*\.(gif|jpg|jpeg|png|bmp|swf)$
{
expires 30d;
}
location ~ .*\.(js|css)?$
{
expires 12h;
}
access_log off;
}
#https ssl 443server
{
listen 443;
server_name app.jinyiyun.net;
index index.html index.htm index.php;
root /storage/wwwroot/app.jinyiyun.net;
ssl on;
ssl_certificate app_jinyiyun_net.crt;
ssl_certificate_key app_jinyiyun_net.pem;
location / {
try_files $uri @apache;
}
location @apache {
internal;
proxy_pass http://127.0.0.1:88;
include proxy.conf;
}
location ~ [^/]\.php(/|$)
{
proxy_set_header X-Forwarded-Proto $scheme;#https proxy_pass http://127.0.0.1:88;
include proxy.conf;
}
access_log off;
}
【注意】:
采用Nginx转发到apache后,PHP代码中想获取当前的协议时代码如下:
<?php
$http_type = ((isset($_SERVER['HTTPS']) && $_SERVER['HTTPS'] == 'on') || (isset($_SERVER['HTTP_X_FORWARDED_PROTO']) && $_SERVER['HTTP_X_FORWARDED_PROTO'] == 'https') || (isset($_SERVER['SERVER_PORT']) && $_SERVER['SERVER_PORT'] == '443')) ? 'https://' : 'http://';
这个时候我们可能发现 $_SERVER['HTTPS'] 的值并不是https,需要我们在入口服务器的nginx的server中写入 proxy_set_header X-Forwarded-Proto https; 使$_SERVER数组中有X-Forwarded-Proto,来判断是否是https访问:
location ~ [^/]\.php(/|$)
{
proxy_set_header X-Forwarded-Proto $scheme;
proxy_pass http://127.0.0.1:88;
include proxy.conf;
}
注意Nginx中 $scheme 是定义好的变量,代表当前访问的协议类型。