
飘易在前面的一篇文章里:Laravel下OAuth 2.0与DingoApi的应用 http://www.piaoyi.org/php/Laravel-OAuth2.0-DingoApi.html 已经大致介绍了dingoapi的安装,这篇文章飘易将详细地记录更多的一些使用技巧以及如何利用dingoapi生成可读的html格式的api文档。
在使用dongo api之前,一定要仔细阅读wiki文档:https://github.com/dingo/api/wiki
安装的版本要求:
Laravel 5.1+ or Lumen 5.1+
PHP 5.5.9+
贴下实际可能使用的路由举例:
/**
 * Dingo Api
 * 仅使用Dingo API的路由才会生成API blueprint
 */
$api = app('Dingo\Api\Routing\Router');
// v1 version API: default
// 如果不是默认版本必须添加header项:Accept: application/vnd.YOUR_SUBTYPE.v1+json
$api->version('v1', ['namespace' => 'App\Http\Controllers\Api\V1'], function ($api) {
    // Overview 概述
    // 无实际功能,用于生成API BLUEPRINT
    $api->get('overview', [
        'as' => 'overview',
        'uses' => 'OverviewController@show',
    ]);

    //OAuth路由
    //Get access_token / Rate Limiting 每IP限制
    $api->post('oauth/access_token', [
        'middleware' => 'api.throttle',
        'limit' => 120, //频次
        'expires' => 1, //分钟
        'uses' => 'OAuthController@access_token'
    ]);
    //grant type: authorization code GET
    $api->get('oauth/authorize', ['as' => 'oauth.authorize.get', 'middleware' => ['check-authorization-params', 'auth'], 'uses' => 'OAuthController@getAuthorize']);
    //grant type: authorization code POST
    $api->post('oauth/authorize', ['as' => 'oauth.authorize.post', 'middleware' => [ 'csrf', 'check-authorization-params', 'auth'], 'uses' => 'OAuthController@postAuthorize']);

    // 新组别 need authentication 要验证权限
    // api.auth 中间件包含了所有oauth验证(oauth,oauth-user,oauth-client)
    $api->group(['middleware' => ['api.auth']], function ($api) {

        // 部门
        $api->get('department', 'DepartmentController@index');
        $api->post('department', 'DepartmentController@store');
        $api->put('department', 'DepartmentController@update');
        $api->delete('department', 'DepartmentController@destroy');
        //Rate Limiting 每IP每1分钟限制访问2次
        $api->get('department/test', [
            'middleware' => 'api.throttle',
            'limit' => 2, //频次
            'expires' => 1, //分钟
            'uses' => 'DepartmentController@test'
        ]);

        //用户
        $api->get('user', 'UserController@index');
        //仅允许特定授权 oauth-user
        $api->get('user/current', ['middleware' => 'oauth-user', 'uses' => 'UserController@current']);
        $api->get('user/{id}', 'UserController@show');

    });
});
【关于授权用户】:
如何获取oauth授权的登录用户呢?这里对应上面的中间件oauth-user,oauth-client有两种对应的用户:user模型,oauthclient模型。
$user = app('Dingo\Api\Auth\Auth')->user();如果你使用了 Dingo\Api\Routing\Helpers 这个trait,那么可以使用auth这个属性:
use Dingo\Api\Routing\Helpers;
use Illuminate\Routing\Controller;

class UserController extends Controller
{
    use Helpers;

    public function __construct()
    {
        $this->middleware('api.auth');
    }

    public function index()
    {
        $user = $this->auth->user();

        return $user;
    }
}
当你使用的是oauth 客户端授权模式时,这个$user返回的模型就是oauth_clients表对应的OauthClient模型;当你使用的是oauth授权码模式以及密码模式时,这个$user返回的模型就是users表对应的User模型。
【关于Rate Limiting】:
$api->get('users', [
  'middleware' => 'api.throttle',
  'limit' => 100,
  'expires' => 5,
  'uses' => 'DepartmentController@test'
]);
上面的路由表示 5分钟内最多可以请求100次。
【关于API Blueprint】
dingo api允许我们使用命令:
php artisan api:doc --output-file "D:\api.apib"
生成API Blueprint 1A 格式的文档;前提是我们已经为我们的控制器和方法写好了注释,比如:
<?php
namespace App\Http\Controllers\Api\V1;

use Illuminate\Http\Request;
use App\Http\Requests;
use App\Http\Controllers\Controller;

/**
 * 用户资源
 *
 * <br/>[注意]:每个部门下的节点不能超过3万个。
 *
 * @Resource("Group User")
 */
class UserController extends ApiBaseController
{

    /**
     * 根据用户ID获取用户
     *
     * [需授权] 返回单个用户
     *
     * @Get("/api/user/ID")
     * @Parameters({
     *      @Parameter("id", type="integer", required=true, description="用户ID")
     * })
     * @Request(headers={"Authorization": "Bearer token"})
     * @Response(200, body={})
     */
    public function show($id)
    {
       //
    }


}
像上面这样写好注释后,使用 api:doc 命令行就会生成标准的 api blueprint 文档了。
【关于aglio】
那么,我们现在有了markdown写法的api blueprint文档了,怎么把它转换成可读的html文档呢?aglio神器就来了。aglio的github地址:https://github.com/danielgtaylor/aglio 注意安装aglio需要先安装NODE.JS,然后利用NPM安装即可:
npm install -g aglio
至于怎么安装node.JS 不是本文的关注点,各位自行搜索。
好了,安装aglio完毕我们就可以使用命令行生成可读的html格式的api文档了:
aglio -i "D:\api.apib" -o "D:\api.html"
生成的api文档如下:
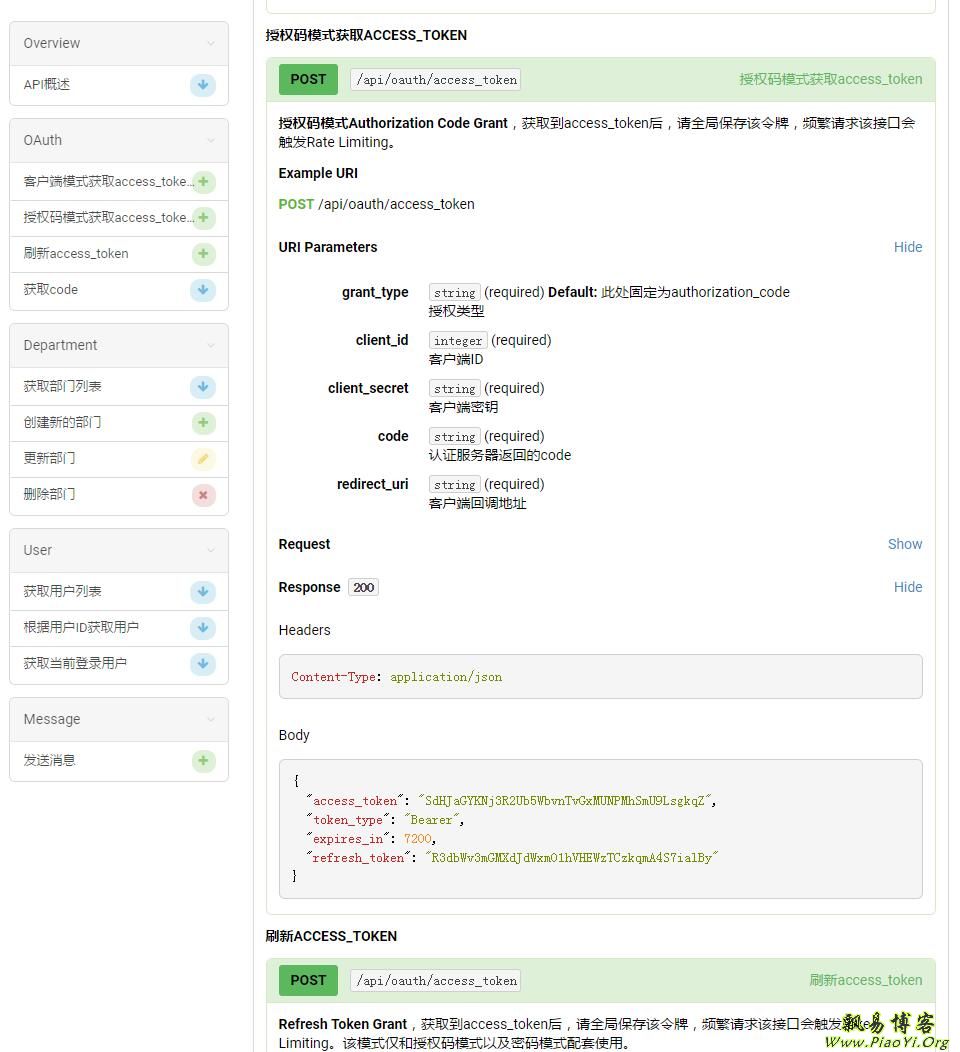
到此,一套比较完善的api文档就新鲜出炉啦。
为了避免每次都要打2次命令,我们可以写一个命令脚本 ApiCreate.bat,比如:
@echo off
echo "API Create Command Tool"
echo Current directory is: %cd%
cd %cd%
::先生成api blueprint格式文档
call php artisan api:doc --output-file %cd%"\api.apib"
::用aglio工具转化成html文档 --theme-full-width
call aglio -i %cd%"\api.apib" -o %cd%"\public\api.html"
pause
这样以后要生产api文档,只要点击执行该bat脚本就可以啦。
关于生成api文档还有另外一个不错的工具:Swagger http://swagger.io/ 飘易会在另外的文章里单独说一说。
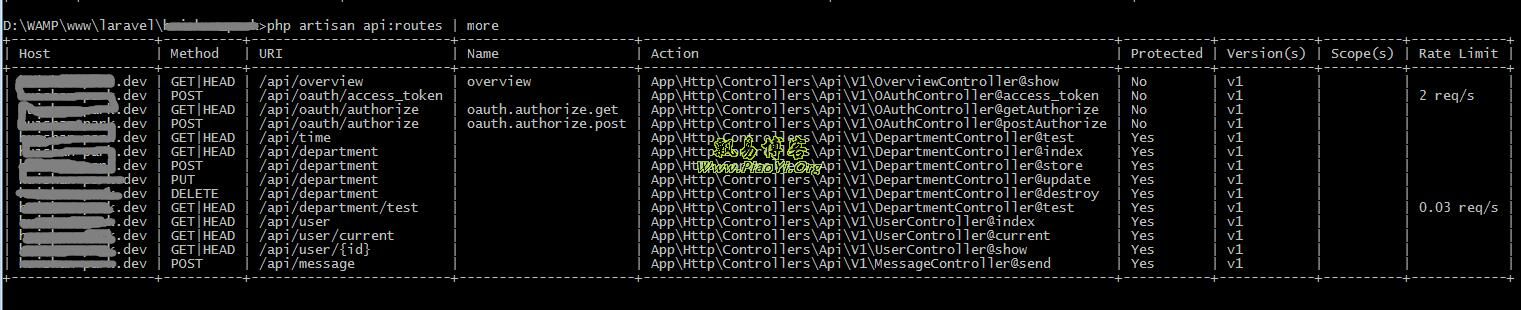
【关于路由列表】
Laravel中显示全部路由是用命令:
php artisan route:list
但是请注意,dingoapi的路由并不在上面的路由里,而是需要利用命令:
php artisan api:routes
来显示属于dingo api的路由。
【关于路由缓存】
Laravel中缓存路由的命令:
php artisan route:cache
而dingo api缓存路由的命令是:
php artisan api:cache
注意,执行 api:cache 命令的时候也会自动执行系统的 route:cache 命令,因此你不必重复执行。
本文完。